Leather sofas are a stylish choice for the living room. Leather is tough, flexible, durable, and stylish. It can stand up to spills, stains, scuffs, and even animal scratches. However, not all leather is created equal. Different finishes will react differently to heat, scratches, spills, and other possible damage.
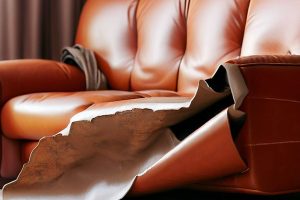
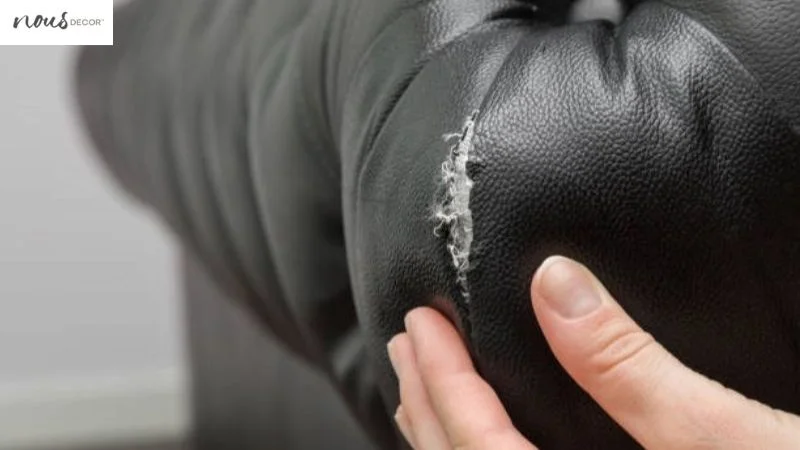
A tear in your leather couch can make for an unsightly appearance in the home. Instead of purchasing a new leather couch, find out how to repair it by following these simple steps.
This guide will demonstrate How To Repair Tear In Leather Sofa. The same process applies to leather: leather furniture, automobile interiors, clothing, and other kinds of leather.
How To Repair Tear In Leather Sofa?
Repairing Minor Nicks
Step 1
Use rubbing alcohol and a soft cloth to clean the area. Use 70% Isopropyl Alcohol to gently rub the surface. This will remove any dirt or grease and prepare the surface to receive leather glue. Excess alcohol should not be left on the surface as it can cause damage to glossy, finished surface coats.
White vinegar can be used instead of nubuck and suede.
The leather cleaner can be used instead. However, many of these products leave a residue on the leather and fail to remove greasy stains.
Step 2
Apply glue to the flap’s underside. Apply glue to the underside of the flap for nubuck, suede, and synthetics like vinyl and bonded leather. Superglue may be more effective for other types of genuine leather. Use a toothpick or large needle to apply a little glue to the underside flap. Then, use a scraper or a knife to cut it into a thin layer.
Step 3
Attach the flap. Press the flap gently onto the leather surface while the glue is still damp. Align the flap, so no material is visible beneath it. Before it dries, quickly wipe off excess glue using a paper towel.
Step 4
Super-glued areas can be sanded gently. You can use super glue to leather by hand. This creates fine dust, which is combined with wet glue to make a filler. You can sand in the direction of cracks until you feel the surface is smooth. Instead of aniline, or any thin, delicate leathers, use 500 grit Sandpaper.
If you used leather glue, skip this step.
Step 5
The leather can be dyed. Apply leather dye to the area that is being repaired. Let it dry.
To confirm that the dye is appropriate for your leather type, check the label. If you are unsure, test it on an inconspicuous spot first.
You can sand down the surface to make repairs easier.
Step 6
Apply leather finish. Apply a leather finish to the dye if it appears dull or matte. A clear finish will protect and add luster to the dye.
Step 7
Let the glue set. Allow the glue to set for at least an hour before you start flexing the material. This will allow the leather glue to bond to the material.
To get the best results, allow the glue to set naturally. It is possible to damage the leather by heat, so using a hairdryer for faster drying is a risky idea.
Check out top Best Leather Sofa 2024: http://nousdecor.com/best-leather-sofa
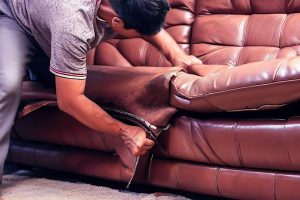
Repairing Tears and Deep Cuts In Leather Sofa
Step 1
You will need to cut a small piece of the sub-patch. Sub patches are needed to provide a solid backing for repairs. Sub patch material can be purchased from a leather repair kit. This will include all the tools necessary for your repair.
You can use any strong, flexible mending fabric or other pieces of vinyl if you don’t own a repair kit. The sub patch should be slightly larger than the tear or hole. For accessible inserting, round the corners.
Step 2
Place the sub patch below the hole. To insert the sub patch in the hole, use a pair of tweezers. Then flatten any folds or wrinkles with a pair. The sub patch should completely cover the hole and be placed between the leather and the substrate.
Step 3
The sub patch should be glued to the leather. Apply a flexible fabric to the leather’s underside with a toothpick or large needle. Apply the glue to the leather where it will touch the sub patch. Apply the glue to the sub patch and gently pull the tear back into its original form. Use a paper towel to remove excess glue.
Step 4
You can weigh the tear as it dries. To apply firm pressure, place a block of wood over the entire area. Allow the glue to dry for at least 20 minutes or as directed on the label.
To speed up drying, check the glue label. Turn down the heat and don’t hold the blower directly against the leather if it does not. Leather can be damaged or dried out by excessive heat.
Step 5
Clean the area. You will need to clean the area before you apply leather glue to fix the hole. Use leather cleaner or 70% alcohol to dampen a rag lightly and then gently clean the area.
In removing excess glue and grease-based stains, alcohol is more effective than a leather cleaner.
Step 6
Remove any fibers from the tear’s edge. This allows the leather filler to create a smooth surface around the tear’s edges. Trim any stringy or loose fibers from the edge of your hole.
Step 7
Use leather filler. Use a palette knife or a brush to fill in any gaps between the edges. To smoothen the filler, use the flat side to scrape off the excess. The filler should be flattened and flush with the rest of the leather surface. You can remove excess filler with a paper towel and feather the leather’s edges that touch the unaffected surface.
Leather repair kits include leather filler.
Step 8
Allow the filler to dry. For an estimate of drying times, refer to the product instructions. After drying, the area should feel dry and gently pressed without it feeling wet or squishy.
If the surface feels uneven after drying, you may need to apply another coat of filler.
Step 9
The repaired area can be dyed. Mix your color using the instructions provided in your repair kit. You can also send a sample to a custom dye company for a match. After choosing the correct color, apply a little dye to the area using a damp sponge. Wait for the dye to dry before covering the entire area. Continue to blend the area outwardly until you achieve a natural appearance.
If you aren’t sure the color is right, test the mixture on a small leather corner. You can quickly wipe off any color that seems off.
Step 10
Apply leather finish. Certain leathers are more lustrous than others. Apply a coat of clear varnish to the dye if it appears too dull or flat. Please wait until it dries. A clear finish will protect the dye and enhance the luster.
Read also our guide on How To Fix A Peeling Leather Couch: http://nousdecor.com/how-to-fix-a-peeling-leather-couch
For Leather that is worn-out and rough to touch
These steps can be used to restore leather that is damaged.
- Spread the filler on a large section of worn or rough leather. Then, use a card to smoothen it. Finally, place your hand in a glove and pat the filler to texture it.
- After drying, sand gently with 500-grit sandpaper; wipe the surface with a damp cloth before applying the dye.
- Apply the leather dye using a damp sponge. Let dry. Repeat the steps until you get the desired color.
- Apply more filler if the area becomes too rough after you have applied the dye.
FAQs
Can faux leather be restored?
Faux leather fabric usually isn’t as durable as genuine leather, but it can be restored with leather cleaning products. However, if the fabric is too old and damaged it may not be worth saving.
How do you repair a split seam on a leather couch?
It is usually best to have professionals repair a split seam in leather couches.
It is difficult to sew leather by hand because of its thickness. You will need special tools, threads, and knowledge to properly do this. Jesse Johnstone, President of Fibrenew says that professionals will be able to match the seam to the rest of your couch to ensure it holds together.
Can leather upholstery be repaired?
Leather upholstery can be repaired as long as the damage is not severe. If the leather upholstery is too damaged, it will need to be replaced.
How to determine if your leather furniture has genuine leather?
If there is one, read it. If it is, it will say “Genuine Leather”.
You should look out for any imperfections in the grain. Bonded leather has a repeating pattern that is used to create its texture.
As much as possible, feel the material between your fingers. Genuine leather becomes lighter when it is folded over.
Is it natural leather-like? Synthetic materials may have a slight chemical odor.
Also, be sure to look at the edges and the underside of your material. It is bonded if you can see a thin layer of fabric in the middle or as backing.
Read also: https://www.thespruce.com/best-leather-repair-kits-4686573
Where do I get leather repair kits, leather glue, and patch material?
Many people find themselves in need of a leather repair kit due to the wear and tear of their belongings. The kits can usually be found at advleather.com. If your leather dye is not exactly the same as yours, it might make your repair look worse than the original damage. You can also get your leather finished custom matched at advleather.com
Do not be concerned if you become aware of punctures and tears from the leather couch. Within this tutorial, you learned how to fix a tear onto a leather couch in the very best way. It’s not only for a leather couch but for also other leather furniture too.
Video: